
Arlecchino
 PyroPolearmMain Damage
TL;DR
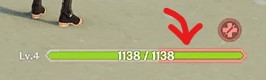
Arlecchino's Skill places a mark on enemies. After five seconds the mark becomes larger. A Charged Attack removes the marks and hands her a Bond of Life (the red section that surrounds her health bar). While it's there, her Normal Attacks become Pyro and hit extremely hard. Attacking drains the bar: Skill then Charged Attack to build it, Normal Attacks to spend it. While she has the bar (which should be always) she can't be healed by anything except her Burst.
Rotation
- Skill (E) on the enemies to mark them.
- Swap out and let your supports do their thing. This buys the five seconds the marks need to mature.
- Swap back and Charged Attack to swallow the marks.
- Normal Attack until the Bond of Life is nearly gone.
- Only Burst (Q) when she's low on health. It spends her whole Bond of Life to heal her. It also resets her Skill cooldown so you can re-apply the marks straight away.
Abilities
| Normal Attacks | A six-hit polearm string. These physical attacks are mediocre until she has a Bond of Life, at which point they become Pyro strikes and account for nearly all her damage. |
|---|---|
| Charged Attack | A short lunge that cleaves enemies. It's how she absorbs the marks and builds her bar. That's the only thing it's for. |
| Skill (E) | Pyro damage and a mark on every enemy hit, lasting 30 seconds. 30 second cooldown but attacking shortens it and her Burst resets it outright. |
| Burst (Q) | Big Pyro hit, then drains her whole Bond of Life bar and heals her with it. Also resets her Skill. Costs 60 Energy. |
| Her health bar | The red section is the Bond of Life and it is the fuel. More of it means more damage and each Normal Attack burns a little off. |
The one mechanic to understand
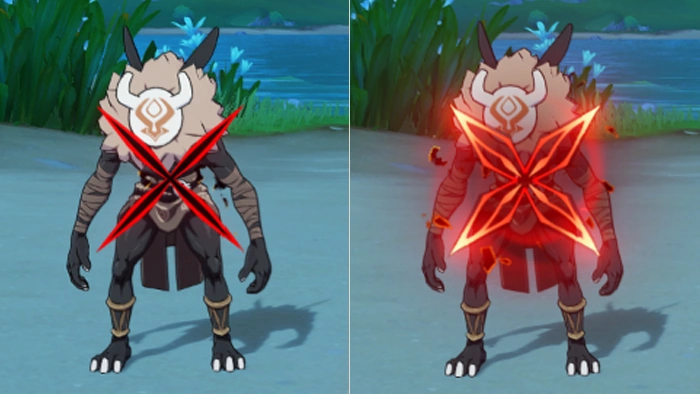
The marks upgrade after five seconds.
Wait about five seconds after your Skill and the marks visibly brighten and get larger. Absorbing an upgraded mark with a Charged Attack is worth roughly double a fresh one, which doubles the damage on everything that follows. That's why the rotation sends her off the field in the middle: your supports are casting anyway, so the wait costs you nothing. Charged Attacking before your marks mature is the easiest way to play her badly.
What actually matters
- Nobody can heal her during combat. Only her own Burst. Bring a shielder if the incoming damage is a problem.
- The Bond of Life is fuel, so don't run dry. Damage scales with how much of it is left, so the last few swings before it empties are your weakest. Re-mark and re-swallow rather than grinding the bar to nothing.
- More HP doesn't mean more damage. The bar is measured as a percentage of her Max HP. The damage bonus is her Attack multiplied by that percentage, so HP artifacts make her tankier without making her stronger. Attack and Crit stats do.
- Skipping the Burst is normal. It's her only heal. Spending the whole bar also costs you a lot of damage, so press it when she needs saving and not before.
Gear
| Weapon | Crit and Attack. Dragon's Bane is the pick if you're running her with Hydro: craftable, has Elemental Mastery and extra damage against anything wet or burning. |
|---|---|
| Artifacts | 4-piece Fragment of Harmonic Whimsy. It pays out when her Bond of Life changes and hers changes constantly. |
| Sands | Goblet | Circlet | Substats |
|---|---|---|---|
| ATK / EM | Pyro DMG | Crit | Crit / ATK |
Elemental Mastery sands instead if you're running her with Hydro for Vaporize. No HP, no Energy Recharge.
 Hydro
Hydro Cryo
Cryo Electro
Don't bother
- Holding the Charged Attack. The long sprint it turns into is for crossing the map, not for fighting.
- Trying to keep her health topped up. Low is where she lives.
- Elemental Mastery with no Hydro or Cryo teammate. No reaction, no benefit.
Want the full deep dive? Read Arlecchino on KeqingMains.
Found something wrong? If a rotation is wrong, or a page skips the bit you needed, the contact form lands straight in my inbox.